 Save
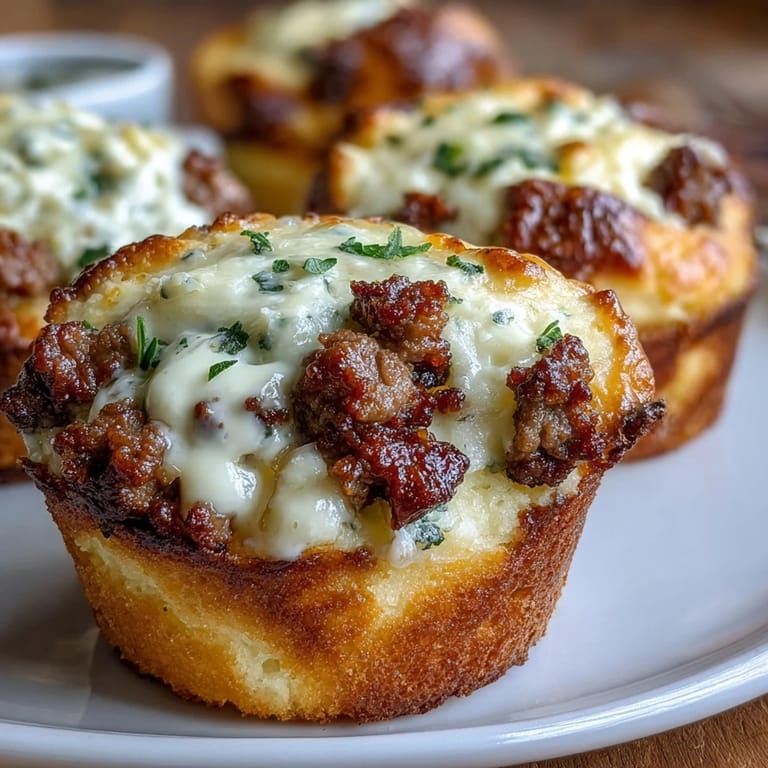
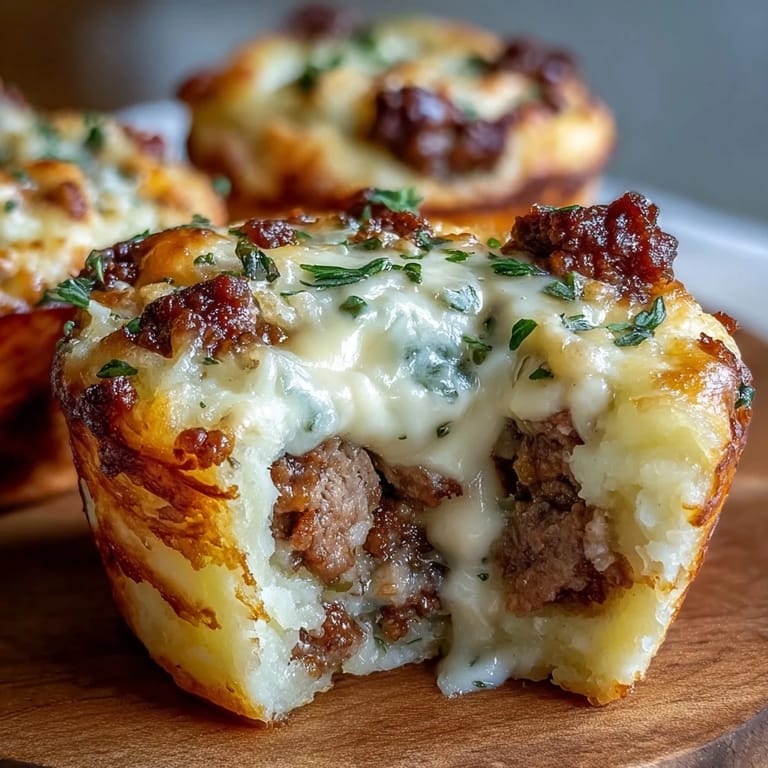
Save There's something about watching a muffin tin transform into a lineup of proper little dinner pies that made me feel like I'd unlocked a secret in my kitchen. My sister brought these to a potluck years ago, each one golden and steaming, and I remember thinking how clever it was to make shepherd's pie in portions—no messy scooping, just individual perfection. That day I asked for her recipe, but what I really wanted was to understand why these tiny pies felt so much more special than the traditional big one. Now whenever I make them, that same magic happens.
I made these for my neighbor when she came home from the hospital, and watching her eyes light up when she opened the container—that moment taught me more about cooking than any recipe ever could. The pies were still warm, the potato tops just beginning to firm up, and she sat at her kitchen table eating one straight from the tin, not bothering with a plate. She called me the next day to say she'd eaten three of them cold for breakfast, which felt like the highest compliment.
Ingredients
- Russet potatoes (2 pounds): Choose potatoes that are roughly the same size so they cook evenly; waxy potatoes won't mash as smoothly, so don't skip the russets.
- Unsalted butter (4 tablespoons): Real butter makes a difference in the potato topping—it's what gives them that silky, restaurant-quality texture.
- Whole milk (1/3 cup): The milk keeps the mash creamy without making it gluey; use it at room temperature and add it slowly while mashing.
- Ground beef or lamb (1 pound): Lamb gives a more traditional British flavor, but beef is what I reach for on weeknights when I want something familiar.
- Tomato paste (2 tablespoons): This concentrated umami bomb adds depth that makes people wonder what your secret ingredient is.
- Worcestershire sauce (1 tablespoon): Don't skip this—it's the background note that makes the filling taste like it's been simmering all day.
- Frozen peas (1 cup): Frozen are actually perfect here because they soften during simmering without turning mushy or releasing all their color into the sauce.
- Beef or vegetable broth (1 cup): A good quality broth matters; I taste it before buying and avoid anything too salty since we're seasoning the filling separately.
- All-purpose flour (2 tablespoons): This thickens the filling just enough so it doesn't pool under the potatoes, but use it cautiously—too much and the filling becomes pasty.
- Fresh thyme (2 teaspoons): Fresh thyme is worth seeking out; if you only have dried, use half the amount because dried herbs are more concentrated.
- Cheddar cheese topping (1/2 cup, optional): This is optional but becomes essential once you've tried it—the cheese edges crisp up and create pockets of salty, melted richness.
Tired of Takeout? 🥡
Get 10 meals you can make faster than delivery arrives. Seriously.
One email. No spam. Unsubscribe anytime.
Instructions
- Get everything prepped and ready:
- Preheat your oven to 400°F and lightly grease the muffin tin while it warms up—this prevents the potatoes from sticking later. Chop your vegetables into small, uniform pieces so they cook evenly and won't leave you with crunchy carrot surprises.
- Start the potatoes early:
- Cut your potatoes into roughly 2-inch chunks, drop them into salted boiling water, and let them simmer until a fork passes through easily without resistance—this usually takes about 15 to 18 minutes. Drain them well in a colander, shaking it gently so no water pools at the bottom.
- Make the mashed potatoes smooth and creamy:
- Return the drained potatoes to the pot, add your butter, and start mashing with a potato masher, working in a circular motion to break down all the lumps. Pour in the milk slowly while you mash, adjusting the consistency as you go—you want it fluffy enough to pipe, but not so wet that it won't hold its shape.
- Build the savory meat filling:
- Heat olive oil in a large skillet over medium heat, then add your chopped onion and carrots, stirring occasionally until the vegetables soften and the onion turns translucent, around 5 minutes. The kitchen will smell sweet and earthy at this point—that's your sign you're on the right track.
- Brown the meat and deepen the flavors:
- Add your minced garlic and cook it for just 1 minute until fragrant, then add the ground meat with a pinch of salt and pepper. Break it apart with a wooden spoon as it cooks, making sure no large clumps remain—you want a uniform texture that distributes evenly in the muffin cups.
- Create a rich, concentrated sauce:
- Once the meat is cooked through and browned, stir in the tomato paste and Worcestershire sauce, letting them cook together for 2 minutes so the flavors meld into the meat. Sprinkle the flour over the mixture, stir it well to coat everything, then pour in your broth slowly while stirring to avoid lumps.
- Finish the filling with vegetables and herbs:
- Add the frozen peas and fresh thyme, then let everything simmer gently for about 5 minutes until the sauce thickens and coats the back of a spoon. You'll notice the mixture goes from soupy to silky—that's when you know it's ready to cool slightly before assembly.
- Fill each muffin cup carefully:
- Spoon about 2 heaping tablespoons of the meat mixture into each greased muffin cup, pressing it down gently with the back of your spoon to create a compact, even layer. This prevents the topping from sinking and keeps everything stable as it bakes.
- Top with creamy mashed potatoes:
- Either pipe the mashed potatoes over each cup using a pastry bag for a fancy presentation, or simply spoon them on and smooth them with the back of a spoon. Make sure the potatoes cover the meat completely and reach to the edges of the cup so they crisp up evenly.
- Add the optional cheese crown:
- If you're using cheddar, sprinkle about a teaspoon over each potato top—it will melt slightly and create little golden crispy patches that people will fight over. Don't feel obligated to use it, but once you do, you'll understand why.
- Bake until golden and crispy:
- Place the muffin tin in your preheated 400°F oven and bake for 18 to 20 minutes, watching until the potato tops turn a beautiful golden color and feel slightly crispy when you touch them. A few darker spots on the cheese make it even better—that's where the flavor concentrates.
- Let them cool just enough to handle:
- Remove the tin from the oven and let the pies cool in the muffin cups for 5 to 10 minutes—this allows them to set slightly and makes them easier to remove without falling apart. Run a spoon or small offset spatula gently around the edges of each cup, then carefully slide it underneath to lift each pie out.
 Save
Save My son once asked why these pies tasted like love, and I didn't know how to explain that it was because they're meant to be shared. These little packages of beef, vegetables, and creamy potatoes somehow turned an ordinary Tuesday night into something that felt like celebration.
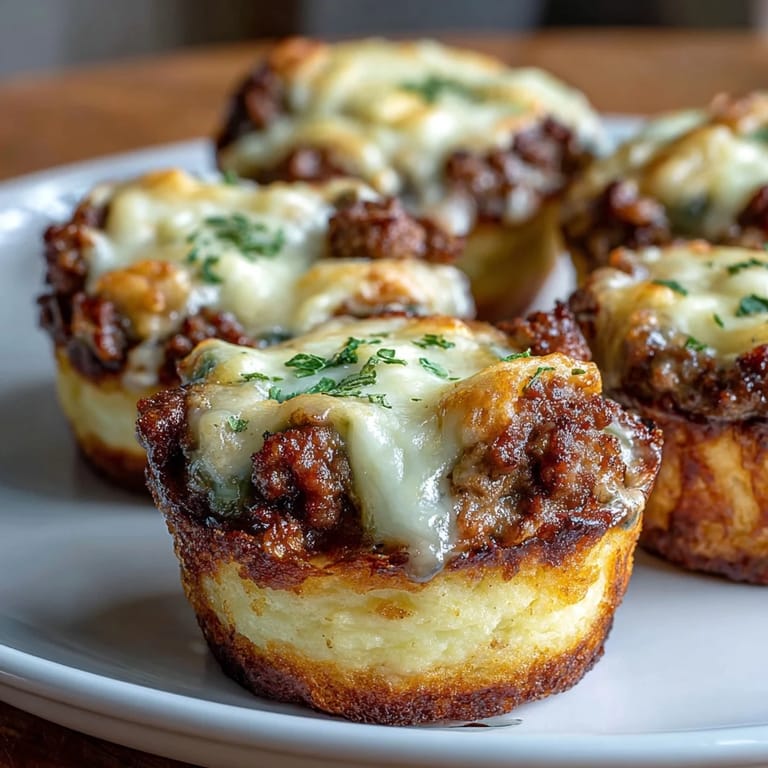
Why These Work Better Than Traditional Shepherd's Pie
The individual size changes everything about how the dish tastes and feels. When you bake shepherd's pie in a large dish, the edges and top get all the attention while the middle stays soft—but in a muffin tin, every single pie gets its own crispy edges, its own golden top, its own perfect ratio of potato to filling. I noticed this the first time I made them, and it fundamentally changed how I think about portion-based cooking. Plus, they're oddly fun to eat straight from your hand if you're being casual about it, something that would be impossible with a forkful from a communal pan.
Make-Ahead Magic and Storage
One of my favorite discoveries was realizing these pies actually taste better when assembled a day ahead and baked the next day. Something about sitting in the refrigerator overnight allows the flavors to settle and meld—the filling becomes more cohesive and the potatoes firm up slightly, which means they crisp even better in the oven. You can also freeze them after baking, wrapped individually in plastic wrap, and reheat them gently in a 350°F oven for about 10 minutes, which makes them perfect for those nights when you need dinner to be effortless.
Variations That Keep Things Interesting
These pies are a canvas for whatever proteins and vegetables you have on hand, which is honestly why I make them so often. Ground lamb brings a more traditional British richness, while ground turkey or chicken makes them lighter and less heavy in your stomach. I've added red wine to the filling for extra depth, swapped regular peas for corn when I'm feeling summery, and even experimented with mixing in a small handful of mushrooms that I've diced fine. The formula stays the same—the filling layer and the potato top—but inside you can hide whatever flavors are calling to you.
- Ground turkey or chicken works beautifully and feels less heavy than beef.
- A splash of red wine during the simmering step adds complexity that makes people ask for your recipe.
- Add finely diced mushrooms or swap corn for peas depending on the season or what's in your pantry.
 Save
Save These little pies have become my answer to the question of what to bring when someone needs feeding or what to make when I want to feel like I've created something both impressive and deeply comforting. They taste like home tastes.
Recipe Questions & Answers
- → What types of meat can I use for the filling?
Ground beef or lamb are classic choices, but ground turkey or chicken can be used for a lighter variation.
- → How do I get the mashed potato topping creamy?
Mash the potatoes with butter, whole milk, salt, and black pepper until smooth and creamy before topping.
- → Can I prepare these mini pies ahead of time?
Yes, you can assemble them and refrigerate for up to 24 hours before baking to save time.
- → What is the purpose of Worcestershire sauce in the filling?
It adds savory depth and enhances the overall flavor profile of the meat and vegetable mixture.
- → How do I prevent the mini pies from sticking to the muffin tin?
Lightly grease the muffin tin with cooking spray or melted butter before filling to ensure easy removal.
- → Is it necessary to use cheddar cheese on top?
Cheddar cheese is optional; it adds a flavorful crust but can be omitted if preferred.