 Save
Save The first time I made these, I wasn't even trying to create a recipe—I was just cleaning out my charcuterie board after a dinner party and staring at the leftover slices of prosciutto and aged cheddar. Something clicked: what if I baked them? Twenty minutes later, I pulled them out of the oven and tasted something revelatory. Crispy, salty, cheese so melted it shattered between my teeth. My partner walked in mid-bite and said, "Wait, did you make those?" Now I make them constantly, sometimes just for myself at midnight.
I brought these to a potluck last spring thinking they'd disappear into a sea of casseroles. Instead, someone's grandmother asked for the recipe. Her exact words were, "This is what potato chips pretend to be." That comment lives in my head rent-free.
Ingredients
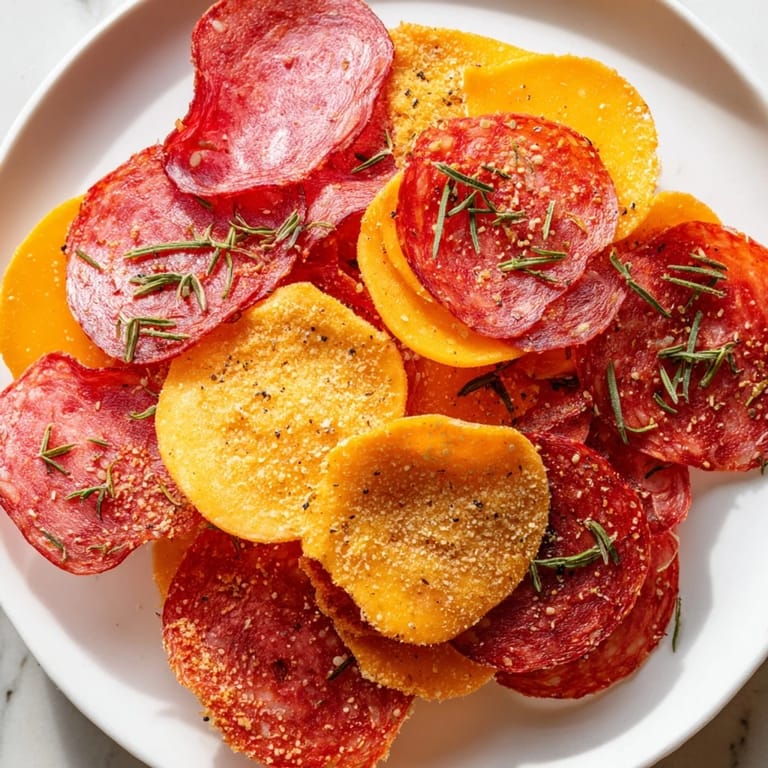
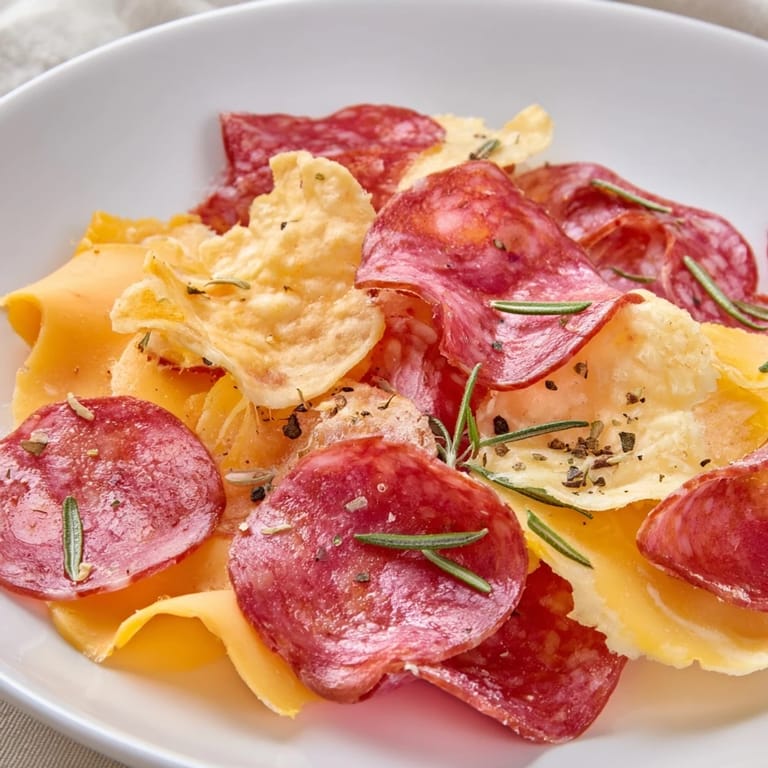
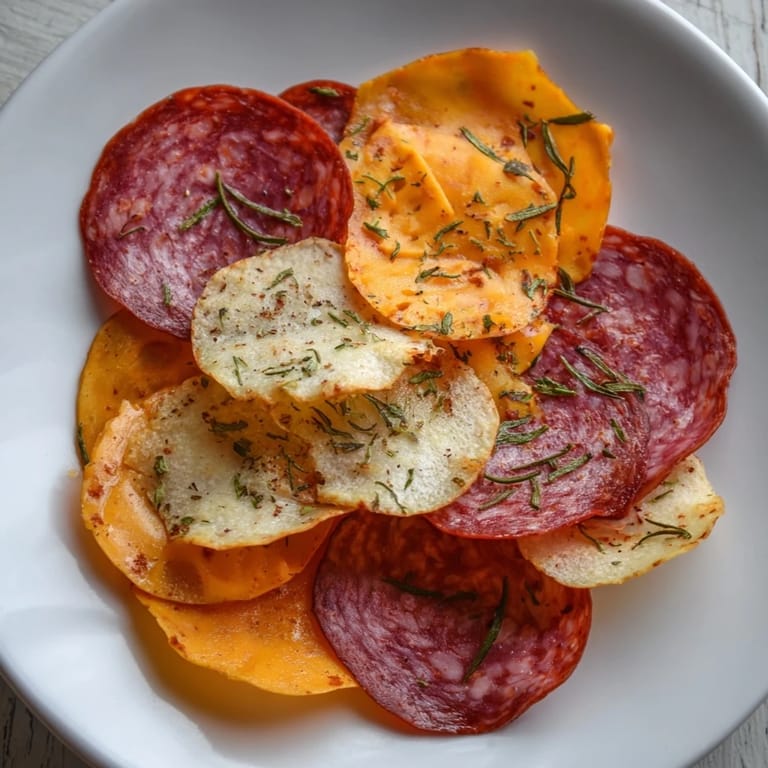
- Thinly sliced salami, 100 g: The paprika-forward one does better than plain varieties—it adds color and a subtle smokiness that transforms during baking.
- Thinly sliced prosciutto, 100 g: Buy it recently sliced if possible; pre-packaged tends to shred rather than crisp up neatly.
- Thinly sliced pepperoni, 100 g: The oil renders beautifully and keeps everything tender, not brittle.
- Hard aged cheese (cheddar, Manchego, or Parmesan), 100 g: Old cheese crisps better than young cheese—it has less moisture and more structure.
- Semi-hard cheese (Gouda or provolone), 100 g: These melt into lacey, crispy edges that catch light on the plate like little edible jewels.
- Fresh herbs (thyme or rosemary) and cracked black pepper, optional: Add them only to the cheese—they'll scorch on the meat.
Tired of Takeout? 🥡
Get 10 meals you can make faster than delivery arrives. Seriously.
One email. No spam. Unsubscribe anytime.
Instructions
- Heat your oven and prepare the stage:
- Preheat to 375°F (190°C) and line two baking sheets with parchment paper. Cold baking sheets mean uneven cooking, so let them warm up a bit.
- Lay out the meat strategically:
- Arrange salami, prosciutto, and pepperoni in a single layer on one sheet without overlapping. They'll shrink slightly and crisp up better with air underneath.
- Position the cheese with intention:
- Lay cheese slices on the second sheet with space between them—they spread, bubble, and fuse if packed too close. This is non-negotiable.
- Season if you're feeling it:
- Sprinkle cheese with herbs or pepper now. The oven will bring everything into focus.
- Bake the meat to shattering point:
- Bake for 8–10 minutes, watching closely after minute 6. You want edges lightly browned and curled, not charred.
- Crisp the cheese to golden perfection:
- Bake for 6–8 minutes until golden and bubbling at the edges. Remove and let cool for 5 minutes before lifting with a metal spatula—they're fragile when hot.
- Cool completely for maximum crunch:
- This is where patience pays off. They crisp further as they cool, becoming almost glass-like.
- Arrange and serve with intention:
- Once completely cooled, arrange on a platter. They stay crispy for about 30 minutes in room temperature, so time your serving.
 Save
Save My youngest asked why I don't just buy chips, and I realized in that moment it wasn't about the food at all—it was about how something so simple transformed into something worthy of being offered. That shift, from leftover scraps to a platter that makes people pause, never gets old.
Choosing Your Meats and Cheeses
Not all cured meats are created equal here. Thicker cuts won't crisp; they'll just shrink into chewy discs. Seek out the thinnest slices your deli counter will give you—almost translucent. For cheese, think aged and structured: young, soft cheeses will just melt into puddles without developing those crispy lacey edges. Visit a proper cheese counter if you can; they'll point you toward varieties that actually crisp rather than just soften.
The Temperature and Timing Dance
375°F is the Goldilocks zone—hot enough to render fat and crisp edges quickly, but not so hot that it scorches before the interiors set. Every oven runs slightly differently, so the first batch is always your temperature test. If your edges are browning but centers aren't crisping, your oven might be running cool; add 15 seconds next time. If you're seeing any blackening at the edges, dial back to 360°F and add a minute to bake time instead.
Serving and Storage Wisdom
These taste best served the moment they've cooled, when the contrast between crispness and salty richness is at its peak. If you must make them ahead, store in an airtight container at room temperature for up to two days—they're still good, but they won't have that fresh snap. Pair them with olives, pickled vegetables, or a wine that cuts through the fat: crisp whites, light reds, even dry rosés all sing alongside these.
- Never refrigerate them; cold resurrects moisture and kills the crispness you worked for.
- A touch of smoked paprika sprinkled on cheese before baking adds a layer of flavor that feels intentional, not accidental.
- They're gluten-free, low-carb, and impressive enough for the people who eat like that—bookmark this for those friends.
 Save
Save These chips have become my answer to the question, "What's something I can bring?" They're foolproof, they impress, and they disappear so fast you'd think you made twice as many. That's the real win.
Recipe Questions & Answers
- → What meats work best for charcuterie chips?
Thinly sliced cured meats such as salami, prosciutto, and pepperoni are ideal for crisp texture and rich flavor.
- → How can I prevent cheese slices from sticking to the parchment?
Space cheese slices apart on parchment and avoid overlapping to ensure easy lifting after baking.
- → Can I add flavor variations to these chips?
Yes, sprinkling smoked paprika on cheese or fresh herbs like thyme and rosemary enhances taste.
- → What is the ideal oven temperature for baking these chips?
Bake at 375°F (190°C) to achieve crisp edges without burning the meats or cheeses.
- → How should leftover charcuterie chips be stored?
Keep leftovers in an airtight container at room temperature for up to two days to maintain crispness.