 Save
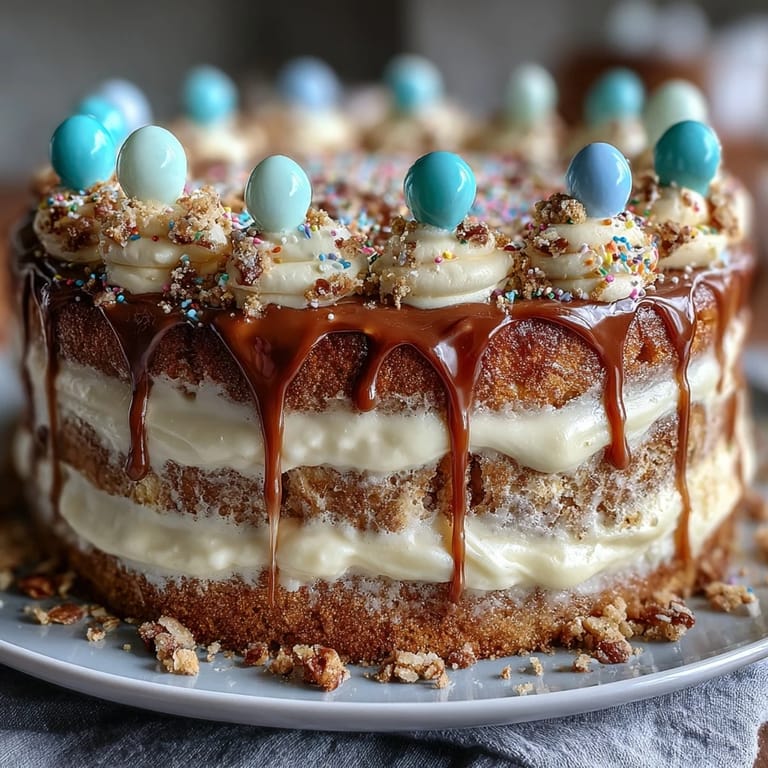
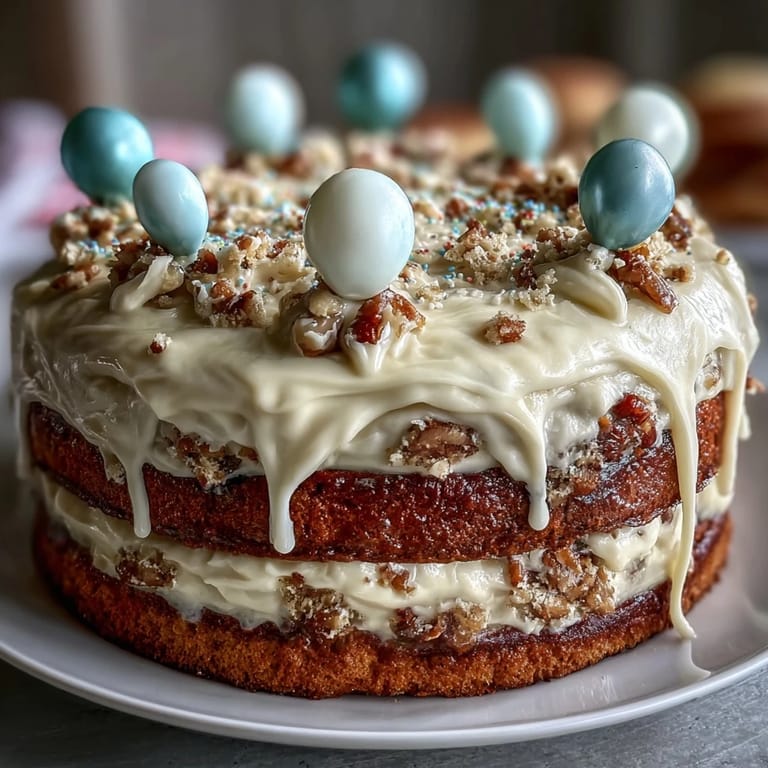
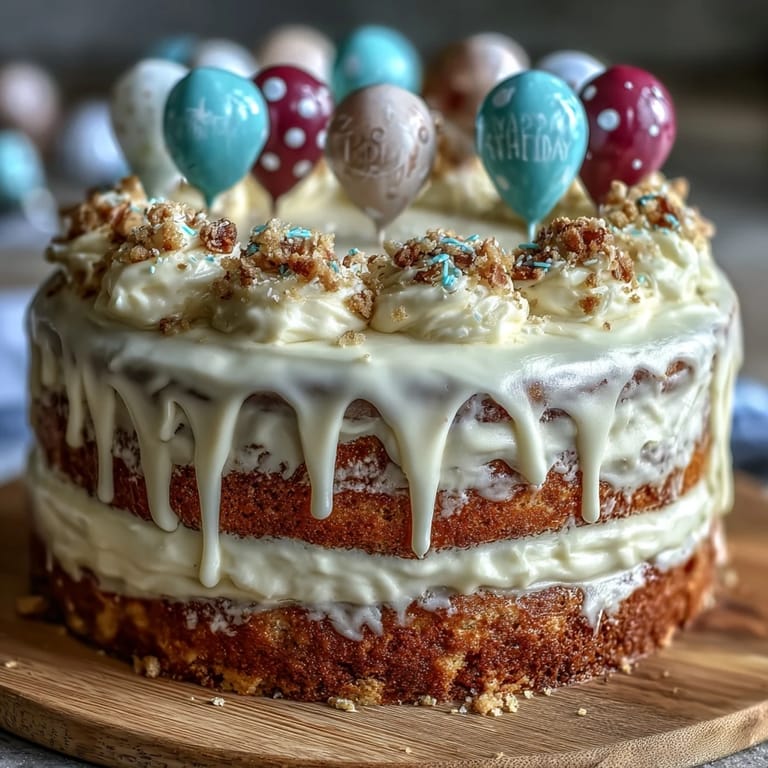
Save My cousin called me three weeks before her graduation with a request that caught me off guard—she wanted me to bake her celebration cake. Not just any cake, but a two-tier showstopper with balloon toppers that would sit front and center at her backyard party. I'd never made a tiered cake before, and honestly, the idea of stacking one cake on top of another while keeping it level felt like architecture, not baking. But something about the hope in her voice made me say yes, and that decision led me down a rabbit hole of cake boards, dowels, and an entirely new respect for the precision required in celebration desserts.
The night before my cousin's party, I was in my kitchen at midnight with both cakes cooling on racks, buttercream whipped to clouds, and my hands shaking slightly as I realized I'd actually pulled this off. My husband walked in, saw the two cake rounds waiting for their destiny, and said something I'll never forget: 'That's going to make her cry.' He was right—when she saw it the next day, decorated with balloons in her school colors, she did cry, and suddenly all those hours of planning and precision mattered so much more than any recipe note could capture.
Ingredients
- All-purpose flour (540 g): The foundation of your sponge—don't sift it before measuring, or you'll end up with a dry cake that won't have that tender crumb graduates deserve.
- Baking powder (3 1/2 tsp): This is your lift, your promise that the cake will rise evenly in both the 8-inch and 6-inch pans, so don't skip or skimp on it.
- Unsalted butter (1 1/2 cups for cake, 2 cups for frosting): Room temperature is non-negotiable here—cold butter won't cream properly, and you'll end up with a heavy, dense cake instead of the cloud-like texture you're after.
- Granulated sugar (2 1/2 cups): This sweetens the cake and also aerates it when creamed with butter, so take the full 3 to 5 minutes to beat them together until it looks pale and fluffy.
- Eggs (8 large): Room temperature eggs blend seamlessly into the batter, whereas cold eggs can cause the mixture to look curdled and affect your final cake structure.
- Vanilla extract (2 tbsp for cake, 2 tbsp for frosting): Pure vanilla makes a noticeable difference in flavor—the imitation version tastes flat compared to the real thing, especially in a celebration cake.
- Whole milk (2 cups for cake, 1/2 cup for frosting): Room temperature milk keeps the batter from seizing up when combined with butter and sugar, ensuring a smooth, lump-free batter.
- Powdered sugar (8 cups, sifted): Sifting removes lumps that would otherwise show up in your frosting and create a grainy texture that undermines all your careful work.
- Gel food coloring: If you're tinting the frosting for school colors, gel colors don't thin the frosting like liquid colors do, so you maintain that perfect spreadable consistency.
- Balloon cake toppers: These transform your cake from 'nice homemade dessert' to 'this is a party'—buy them online or make them with food-safe sticks and small balloons.
Tired of Takeout? 🥡
Get 10 meals you can make faster than delivery arrives. Seriously.
One email. No spam. Unsubscribe anytime.
Instructions
- Prepare your workspace:
- Preheat the oven to 350°F and grease those four pans—two 8-inch and two 6-inch—lining each with parchment paper so your cakes release without sticking. I learned this the hard way: skipping the parchment paper means hand-scraped cake fragments instead of pristine layers.
- Mix your dry ingredients:
- Whisk together flour, baking powder, and salt in a bowl, making sure the baking powder is evenly distributed throughout so every bite of cake rises the same way. This step looks simple but it's where even distribution happens.
- Cream butter and sugar:
- Beat the room-temperature butter and sugar together for a full 3 to 5 minutes until it's pale, fluffy, and noticeably lighter in color—this is where you're incorporating air that will make your cake tender. Don't rush this step; it's worth those few extra minutes.
- Add eggs one at a time:
- Drop in each egg and beat well before adding the next one, letting each one fully incorporate so your batter stays emulsified and smooth. If it looks slightly curdled, don't panic—the flour mixture will bring it back together.
- Mix in vanilla:
- Add the vanilla extract and beat briefly to combine, then prepare for the alternating additions that come next.
- Alternate flour and milk:
- With your mixer on low, add one-third of the flour mixture, then half the milk, then another third of flour, then the remaining milk, finishing with the last third of flour—this prevents overmixing and keeps your cake tender. Mix just until combined after each addition; overworking develops gluten and makes the cake tough.
- Divide and fill pans:
- Split the batter evenly between all four pans and tap them gently on the counter to release air bubbles that could create tunnels in your finished layers. The batter will seem thin, but that's exactly what you want for a moist sponge.
- Bake with patience:
- Bake the larger 8-inch cakes for 35 to 40 minutes and the smaller 6-inch cakes for 25 to 30 minutes, testing with a toothpick when you think they're close—it should come out clean or with just a crumb or two. Every oven runs differently, so start checking a few minutes early.
- Cool with care:
- Let the cakes rest in their pans for exactly 10 minutes—this allows them to set slightly so they won't fall apart when you turn them out—then transfer them to wire racks to cool completely. This patience step is what separates a crumbly cake from one that holds together beautifully.
- Make your frosting:
- Beat the room-temperature butter until it's creamy, then add the sifted powdered sugar gradually while beating, scraping down the bowl frequently to catch any hidden lumps. Add vanilla, salt, and milk one tablespoon at a time until you reach a smooth, spreadable consistency that holds peaks but isn't stiff.
- Level and layer:
- If your cake tops have domed slightly, trim them flat with a serrated knife so your layers stack evenly, then place one 8-inch cake on your cake board and spread a generous layer of frosting on top. Repeat this process with the 6-inch cakes, creating two separate tiered bases.
- Apply the crumb coat:
- Spread a thin layer of frosting over both cakes to seal in crumbs, then chill for 20 minutes—this prevents crumbs from showing up in your final frosting and makes you look like a professional. When you come back, that frosting will be set and ready for the final coat.
- Frost with confidence:
- Apply the remaining frosting in smooth, generous strokes, using an offset spatula and a cake turntable if you have one—the turntable makes everything easier, but a steady hand works too. Take your time here; this is the moment where your cake goes from 'I made this' to 'Did you make this?'
- Stack with support:
- Place the 6-inch tier centered on top of the 8-inch tier, using cake dowels or food-safe straws pushed into the bottom layer to support the weight—this prevents the bottom cake from getting crushed. If you skip this step and the cake is heavy enough, you'll watch in slow-motion horror as it sinks.
- Decorate and celebrate:
- Top with your balloon toppers and sprinkle edible confetti around the base, stepping back to admire your work before the party begins. This is the moment when all the effort becomes visible.
 Save
Save What struck me most about baking this cake wasn't the technical precision, though there was plenty of that—it was the moment I realized my cousin would cut into it and find layers as moist and tender as if a bakery had made it. She'd taste the vanilla and know I cared enough to use the real stuff, and the balloon toppers would make her laugh every time someone asked if it was from a fancy bakery. Food does something remarkable when it's made with intention for someone you love; it becomes a memory instead of just dessert.
Why Room Temperature Matters More Than You Think
The first time I baked this cake, I grabbed eggs straight from the fridge because I was in a hurry, and the batter looked grainy and separated no matter how much I beat it. I added flour anyway, hoping it would fix itself, and ended up with a dense cake that my cousin was too polite to criticize. The second time, I planned ahead, pulled everything out an hour early, and the batter came together like silk. Room temperature ingredients aren't a suggestion—they're the invisible backbone that determines whether your cake is tender or tough, whether it looks homemade in the best way or in the 'I tried' way.
The Crumb Coat Secret
After my first attempt, I watched YouTube videos of professional bakers and kept seeing them apply this thin layer of frosting, chill it, then frost over it, and I initially thought it was unnecessary fussiness. But when I tried it, the difference was immediate—no crumbs mixing into my final frosting, no rough patches showing through, just smooth, clean layers that looked intentional. That 20-minute chill in the middle of frosting feels like it's adding time, but it actually saves you from frosting the whole cake twice because you messed up the first coat.
Stacking Without Disaster
The scariest moment of making this cake came when I realized I didn't have cake dowels and considered just stacking the tiers without support. I texted my baker friend, and she replied immediately with a photo of food-safe straws she'd used—basically showing me that dowels aren't fancy or expensive, they're just necessary physics. I ran to the store, bought straws, measured how deep to insert them so they'd be invisible, and suddenly the whole operation felt stable. Without those supports, the top tier would have slowly compressed the bottom one into a pancake by the end of the party.
- Dowels or straws should be pushed straight down through the frosting into the cake, spaced evenly around the tier being supported.
- Trim them flush with the top of the cake so they don't stick out when the top tier lands.
- If you skip this step and the tiers start sliding or sinking, it's nearly impossible to fix without starting over, so invest the two minutes upfront.
 Save
Save Graduation cakes are about more than sugar and butter—they're about showing up for someone on a day that matters. This two-tier vanilla sponge with its cloud-like frosting and playful balloon toppers does exactly that, whether it's your first tiered cake or your tenth.
Recipe Questions & Answers
- → How do I keep the cake layers moist?
Ensure not to overbake and use room temperature ingredients for better mixing. Proper measuring and mixing result in a tender crumb.
- → What is the best way to stack two tiers safely?
Use cake dowels or straws inserted into the bottom tier for support before placing the smaller tier on top to prevent shifting.
- → Can I add colors to the buttercream frosting?
Yes, gel food coloring can be gently mixed into the buttercream to match any theme while maintaining smooth texture.
- → How long should the cake cool before frosting?
Cool cake layers completely on wire racks, typically about 1 hour, to ensure frosting adheres smoothly without melting.
- → Are balloon toppers safe for cake decoration?
Use food-safe sticks and mini balloons designed for cake decoration to ensure safety and easy removal after use.