 Save
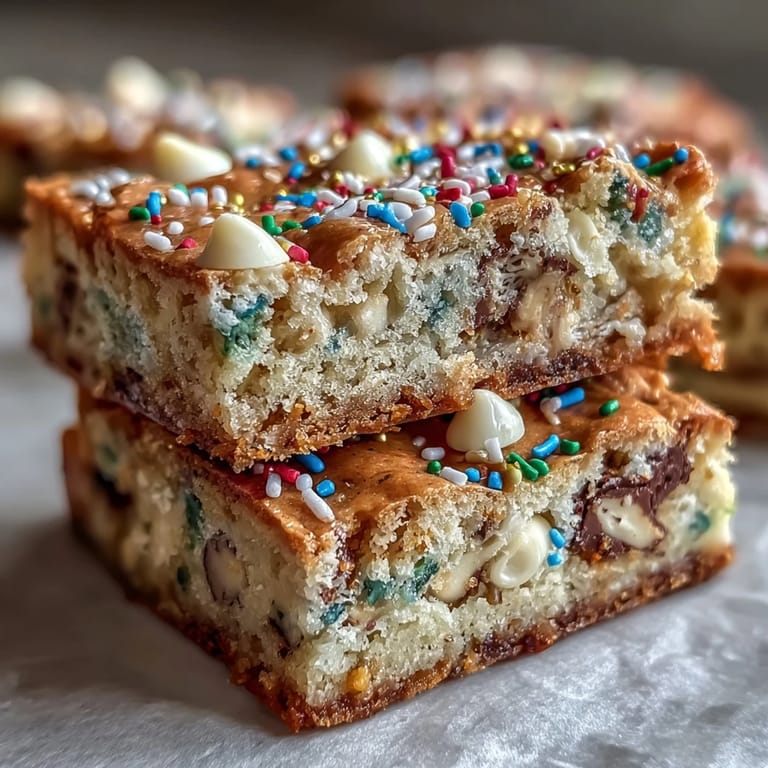
Save My kitchen turned into a rainbow explosion the first time I made these bars, and honestly, I haven't looked back since. There's something about baking treats that celebrate a holiday that makes the whole house feel lighter, brighter, somehow more festive before anyone even takes a bite. My kids spotted the bag of rainbow sprinkles on the counter and immediately started planning their St. Patrick's Day party strategy around these buttery, colorful squares. What started as a simple idea became our March tradition, the kind of recipe that gets requested weeks in advance.
I made a triple batch for a St. Patrick's Day potluck last year, and watching people's faces light up when they saw the rainbow layers was worth every ounce of butter that went into the mixing bowl. One of my coworkers actually paused mid-conversation to compliment them, which rarely happens with desserts that aren't chocolate cake. That moment sealed it for me—these bars somehow manage to feel both whimsical and genuinely delicious, which is harder to pull off than it sounds.
Ingredients
- All-purpose flour (2 cups): The foundation that holds everything together without becoming heavy or dense.
- Baking powder (1/2 teaspoon): Just enough lift to keep these bars tender and cake-like rather than thick and gummy.
- Salt (1/4 teaspoon): The secret amplifier that makes every other flavor pop, especially important with sweet sprinkles.
- Unsalted butter (3/4 cup, melted and cooled): The richness that keeps these bars moist and gives them that butter cookie texture we're after.
- Granulated sugar (1 cup) and light brown sugar (1/2 cup): Together they create depth of flavor and the perfect moisture balance that regular sugar alone can't achieve.
- Large eggs (2): The binder that ties everything into a cohesive batter without making it too eggy.
- Pure vanilla extract (2 teaspoons): Non-negotiable for rounding out the sweetness and adding warmth to every bite.
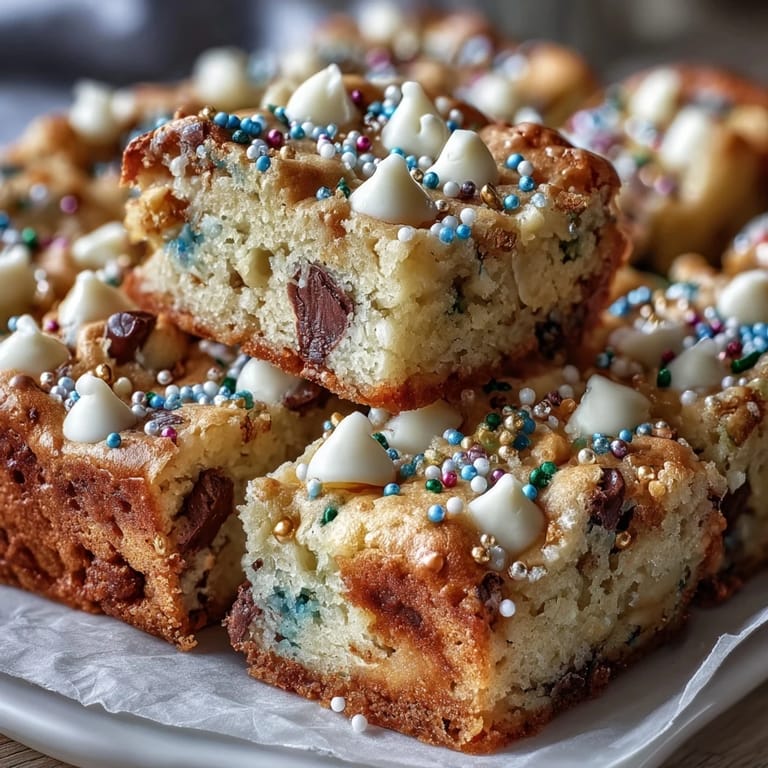
- White chocolate chips (3/4 cup): They soften slightly during baking and create little pockets of creamy sweetness throughout.
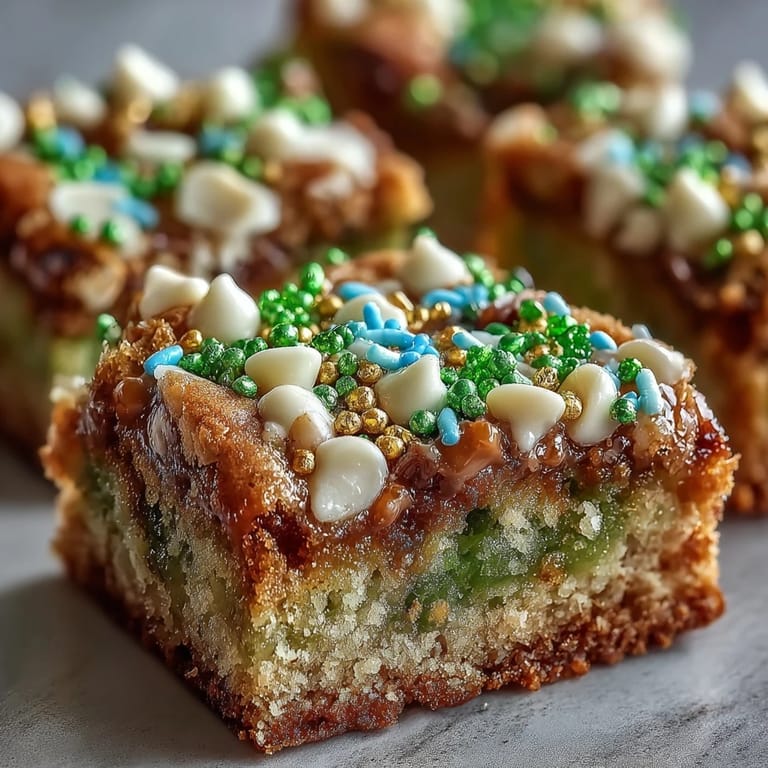
- Rainbow sprinkles (1/2 cup, divided): Not just for looks—they add subtle sweetness and keep their crunch if you save some for the top before baking.
Tired of Takeout? 🥡
Get 10 meals you can make faster than delivery arrives. Seriously.
One email. No spam. Unsubscribe anytime.
Instructions
- Prepare your pan like you mean it:
- Preheat your oven to 350°F and line a 9x9-inch baking pan with parchment paper, making sure there's enough overhang to lift the entire batch out later. This step saves you from frustration and guarantees clean bars with crispy edges.
- Combine the dry team:
- Whisk together your flour, baking powder, and salt in a medium bowl until everything feels evenly distributed. Set this aside and resist the urge to over-mix once the wet ingredients arrive.
- Build the wet base:
- In a larger bowl, whisk your melted butter with both sugars until the mixture looks smooth and slightly glossy. Add your eggs and vanilla, whisking until the whole thing comes together as a pale, emulsified mixture.
- Bring it all together gently:
- Fold your dry ingredients into the wet mixture using a spatula, moving slowly and deliberately to avoid overworking the batter. Stop as soon as you don't see streaks of flour anymore—lumps are your friends here.
- Scatter in the fun stuff:
- Stir in the white chocolate chips and about a third of your rainbow sprinkles, making sure they're distributed without crushing them. Save the rest of the sprinkles for the top so they stay bright and colorful.
- Get it into the pan:
- Spread the batter evenly across your prepared pan, then sprinkle the remaining rainbow sprinkles generously over the surface. Press them down just slightly so they'll bake in rather than slide off.
- Bake with confidence:
- Slide into the oven for 25 to 28 minutes, checking around the 24-minute mark for golden edges and a mostly-clean toothpick in the center. The top should feel set but still have a tiny bit of give when you touch it.
- Cool completely before slicing:
- Leave the pan on a wire rack until everything reaches room temperature, which takes patience but prevents the bars from falling apart. Once cooled, use that parchment overhang to lift the whole thing out and slice into 16 perfect squares.
 Save
Save There's something almost magical about pulling a pan of these bars from the oven and seeing the sprinkles have melted into tiny bursts of color throughout the golden sponge. My neighbor caught the smell wafting across our fence one afternoon and showed up at the door asking what I was baking, which is how these bars became a regular fixture at our block parties too.
Choosing Your Sprinkles Wisely
Not all rainbow sprinkles are created equal, and this matters more than you'd expect with such a simple recipe. Some brands use artificial dyes that taste medicinal, while others deliver genuine vanilla flavor that actually complements the butter and white chocolate. My best move was grabbing a couple of different brands and doing a side-by-side comparison, which taught me that paying a bit more for quality sprinkles transformed these bars from cute to genuinely delicious. The sprinkles aren't just decoration here—they're an actual ingredient that contributes to the overall experience.
Storage and Staying Power
These bars keep beautifully in an airtight container at room temperature for up to four days, which means you can bake them the day before your celebration without any stress. I've discovered they actually taste even better on day two once all the flavors have settled and melded together slightly. They're sturdy enough to transport to parties without turning into crumbs, yet tender enough to feel homemade and thoughtful.
Beyond the Basic Recipe
Once you've made the base version, there's so much room to play around depending on your mood and what's in your pantry. I've drizzled melted white chocolate over the cooled bars and immediately topped it with a few extra sprinkles before it sets, creating an almost professional bakery finish. A friend suggested adding a tiny pinch of almond extract to the batter for depth, and now I do that every time because it somehow makes the whole thing taste richer without being obvious about it.
- Swap white chocolate chips for semisweet or milk chocolate if that's what you have on hand.
- Dust the baked bars with green sanding sugar while still warm for extra shimmer and texture.
- Make these a week ahead and store them in the freezer—they thaw beautifully and taste just as good.
 Save
Save These bars have become my go-to celebration dessert because they prove that festive food doesn't have to be complicated to be memorable. Every time I make them, someone asks for the recipe, which is the highest compliment a baker can receive.
Recipe Questions & Answers
- → How do I prevent the bars from sticking to the pan?
Line the baking pan with parchment paper leaving some overhang for easy removal after baking.
- → Can I substitute white chocolate chips?
Yes, semisweet or milk chocolate chips can be used as alternatives based on preference.
- → How long do the bars stay fresh?
Store in an airtight container at room temperature for up to 4 days to maintain freshness.
- → What is the ideal baking temperature?
Bake the bars at 350°F (175°C) until edges turn golden and a toothpick comes out mostly clean.
- → Can I add extra decorations?
Yes, drizzling with melted white chocolate or adding small shamrock candies enhances the festive look.